How to Hand Draw a Truss Roof Framing Plan
Reference Number: KB-00981
Terminal Modified: March xv, 2022
The data in this article applies to:


QUESTION
How do I create a roof truss?

ANSWER
Cartoon roof trusses in Master Architect is equally simple equally cartoon and replicating it - as long as certain conditions are met. Roof trusses in the program are divers by the position of one or more than roof planes above and one or more ceilings beneath, so both must be in place before a truss is fatigued.
- The roof and ceiling planes tin can be automatically generated or manually drawn.
- The ceiling tin be composed of the default flat ceiling generated in each room past default, of manually-fatigued planes created using the Ceiling Plane tool, or of a combination of the two.
- There must be space between the roof and ceiling in which a truss can generate. Trusses cannot be generated forth the line where the roof and ceiling come together, usually on a bearing wall.
To create a roof truss
- Open
 the plan in which you lot would like to create roof trusses, or select File> New Plan
 .
.In this example, a unproblematic 20' x 30' structure is used.

- With the Select Objects
 tool, select the left and right walls, then click the Open up Object
 edit button.
 - On the Roof console of the Wall Specification dialog that opens, cull the Full Gable Wall option, then click OK.
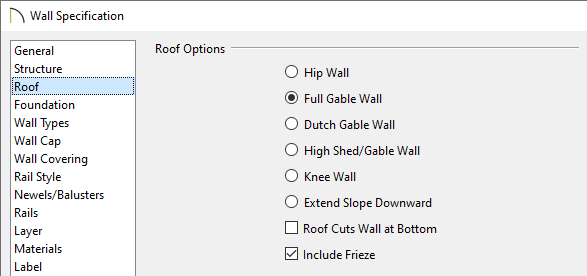
For additional information on building an automatic gable roof, visit the "Generating Automatic Hip and Gable Roofs" article linked in the Related Articles department below.
- Select Build> Roof> Build Roof
 from the menu, and on the Roof panel of the Build Roof dialog that appears:
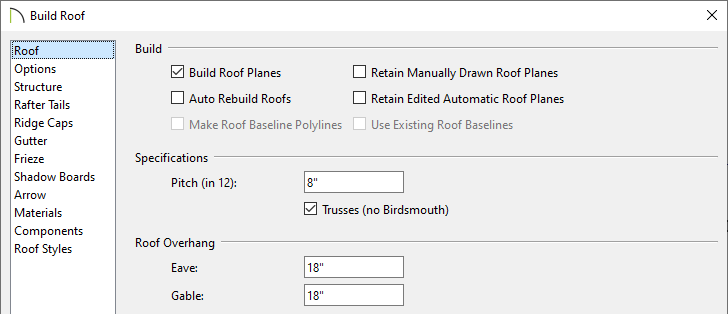
- Check the Build Roof Planes box.
- Check Trusses (no Birdsmouth).
The Trusses (no Birdsmouth) setting sets the roof height so that the lesser edge of the truss height chord is flush with the acme of the wall and roof plane thickness is based on the default Top Chord Depth set in the Framing Defaults. If it is not checked, the roof plane thickness is determined by the rafter Depth setting in the Framing Defaults.
If you plan to employ both trusses with rafters, exit Trusses (no Birdsmouth) unchecked so that the rafters' depth tin be accommodated. Please review the "Mixing Trusses with Stick Framing" department of the Reference Manual for more information.
- Specify your desired Pitch (in 12) and Roof Overhang values.
In this example, an viii" in 12" pitch is specified with eighteen" overhangs.
- Once all desired changes take been made, click OK to build the roof.
- Select Build> Framing> Roof Truss
 from the menu, then click and elevate a line at a location where y'all would similar a roof truss.
Annotation: A Message may appear asking "The layer "Framing, Roof Trusses" is not displayed. Practise you want to turn on the display of this layer in the current view?" Click Aye to display the Roof Trusses layer in this view.
- Brand sure Temporary Dimensions
 are toggled on, enable the Select Objects tool, so click on the truss to select information technology.
 - When the truss is selected, a dimension will depict how far it is from a perpendicular wall. Click on the dimension, type your desired value in the text field, and so printing Enter on the keyboard.
In this example, 0" is specified.

The truss will motion and then that its outer edge is aligned with the outer border of the framing layer of the wall

To replicate trusses
- Using the Select Objects tool, click on the single roof truss to select information technology, and then click on the Multiple Copy
 edit button.
 - Past default, the Multiple Copy interval for trusses is 24" (600 mm). To change this interval, click the Multiple Copy Interval
 secondary edit button, specify the desired Master Showtime value for All Trusses, and so click OK.
In this case, the default Primary Offset value of 24" is used.
Note: Multiple Re-create is non available in Abode Designer Pro. Instead, use the Transform/Replicate edit tool. As an example, if yous wanted to create 6 copies all separated a certain distance from each other, you would bank check the Copy box, set the Number of Copies to 6, and so cheque the option for Motility and set the X Delta to be 24". Negative values can as well be ready for each of the deltas if needed.

- Hover over the main Motion edit handle on the truss until yous see the Multiple Re-create
 cursor brandish, then click and elevate across the structure. As you drag, new trusses volition be created at regular intervals. Release the mouse push button to complete the command.
- Create a Perspective Framing Overview
 to come across the results.
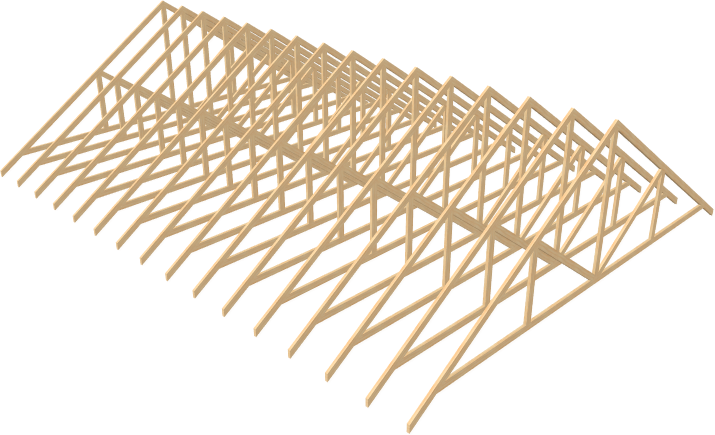
To create a reduced gable or an cease truss
- With the Select Objects tool, select the trusses on either end of the gable and click the Open Object edit button.
Holding the Shift primal while selecting object allows you to group select multiple trusses. For more than information on grouping selecting objects, please see the Related Articles section below.
- On the Full general panel of the Roof Truss Specification dialog that opens, check the End Truss and Force Truss Rebuild boxes.
- Bank check the Reduced Gable box in this dialog also to lower the top chord of an End Truss so that lookouts can pass over the truss.
- Click OK to rebuild the truss based upon the settings but specified.
- Create a Perspective Framing Overview to see the results.

For more information on roof trusses, please see your program's Reference Manual or the Related Manufactures department below.
Source: https://www.chiefarchitect.com/support/article/KB-00981/creating-roof-trusses.html
Posting Komentar untuk "How to Hand Draw a Truss Roof Framing Plan"